本篇要解決的問題
幾年前有寫了一篇〈ML5.js 神經網路 開發圖像辨識〉,是辨識圖片裡的物件,最近跟朋友設計一個活動,是需要判斷照片中的人數,ML5 有點不夠用,問了 ChatGPT 後,知道了 Tensorflow.js 裡,有一個 COCO-SSD 的模型,官方的說明 是「在單一影像中定位及辨識多個物件」,實際用起來後,也真的覺得好用,除了可以把人辨識出來,還可以給在照片上的範圍。
本篇主要參考的來源,是 官方說明文件、ChatGPT 的回答。
最後完成的 Demo:
https://letswritetw.github.io/letswrite-coco-ssd
基本使用
官方文件的使用教學很基本,就是我們用 img src 把圖檔放上去後,再用 COCO-SSD 這個模型來進行辨識,程式碼如下:
<script src="https://cdn.jsdelivr.net/npm/@tensorflow/tfjs"> </script>
<script src="https://cdn.jsdelivr.net/npm/@tensorflow-models/coco-ssd"> </script>

<img id="img" src="cat.jpg"/>

<script>
  const img = document.getElementById('img');
  cocoSsd.load().then(model => {
    // detect objects in the image.
    model.detect(img).then(predictions => {
      console.log('Predictions: ', predictions);
    });
  });
</script>
進階用法
這邊 August 因為跟朋友設計的活動,是要讓參加活動的人,自己拍照後上傳,所以不能像官方的範例一樣,直接就能取得圖片。
以下程式碼使用 Vue.js 來實作。
HTML
HTML 的部份,我們放一個上傳檔案的按鈕,跟要在照片上標出辨識範圍的 canvas:
<input
    type="file" ref="photo"
    accept="image/*"
    @change="photoHandler"/>

<canvas id="canvas"></canvas>
accept 限制使用者只能上傳圖片。
ref="photo" 是要在 Vue.js 裡能抓到使用者選擇的 file。
photoHandler 就是稍後要寫在 Vue.js 的 method。
Vue.js / JavaScript
因為 model 載入要時間,如果不想每次都載入,就要把 model 存在 data。
辨識的結果也需要存在 data,才好把結果呈現在畫面上。
data() {
  return {
    result: null,
    modal: null
  }
}
methods 先來處理使用者選擇了圖片檔:
async photoHandler() {
  const file = this.$refs.photo.files[0];
  if (!file) return;

  // 載入 COCO-SSD 模型
  this.model = this.model || await cocoSsd.load();

  const imageElement = document.createElement('img');
  imageElement.src = URL.createObjectURL(file);

  imageElement.onload = async () => {

    this.result = await this.model.detect(imageElement);

    // 在照片上標出範圍
    this.drawBox(imageElement, this.result);

    // 清除暫時創建的圖檔 URL
    URL.revokeObjectURL(imageElement.src);

  };
}
COCO-SSD 辨識的結果,會是一個陣列,像這樣:
[
  {
    "bbox": [
      244.66079431772232,
      405.9116929471493,
      304.8147379755974,
      786.6561211645603
    ],
    "class": "person",
    "score": 0.9971041083335876
  },
  ...
]
bbox 是辨識出的範圍。
class 是辨識結果,score 是信心值,愈接近 1 就愈準。
我們在照片用 COCO-SSD 辨識完後,執行了 drawBox,主要是標出照片裡 COCO-SSD 辨識的物件。
async drawBox(imageElement, predictions) {
  const canvas = document.getElementById('canvas');
  const context = canvas.getContext('2d');

  // 設定畫布大小與圖片一致
  canvas.width = imageElement.width;
  canvas.height = imageElement.height;

  // 畫圖片到畫布上
  context.drawImage(imageElement, 0, 0, canvas.width, canvas.height);

  for (let prediction of predictions) {
    const [x, y, width, height] = prediction.bbox;
    const text = `${prediction.class} (${(prediction.score * 100).toFixed(2)}%)`;

    // 畫框
    context.strokeStyle = 'yellow';
    context.lineWidth = 8;
    context.strokeRect(x, y, width, height);

    // 設定字體樣式
    context.font = '28px Arial';
    context.fillStyle = 'yellow';

    // 量測文字寬度與高度
    const textWidth = context.measureText(text).width;
    const textHeight = 28 * 1.5;
    const padding = 8;

    // 畫白色背景框,包含 padding
    context.fillStyle = 'white';
    context.fillRect(x - padding, y - 20 - textHeight - padding, textWidth + padding * 2, textHeight + padding * 2);

    // 畫文字
    context.fillStyle = 'black'; // 文字顏色
    context.fillText(text, x + padding / 2, y - 10 - textHeight / 2);
  }

}
辨識範例、原始碼
我們來試一下結果,以下圖片是在可商用的素材網 Pixabay 上下載的。
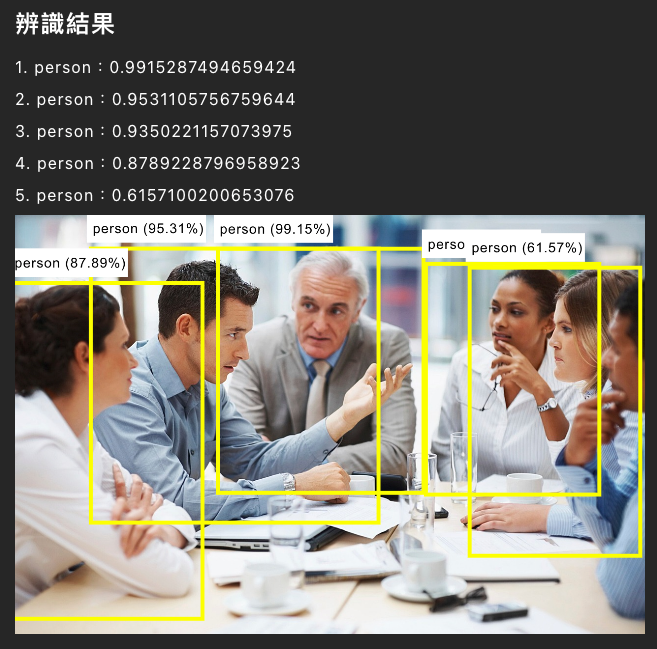
先來辨識一群人:
接著來辨識動物:
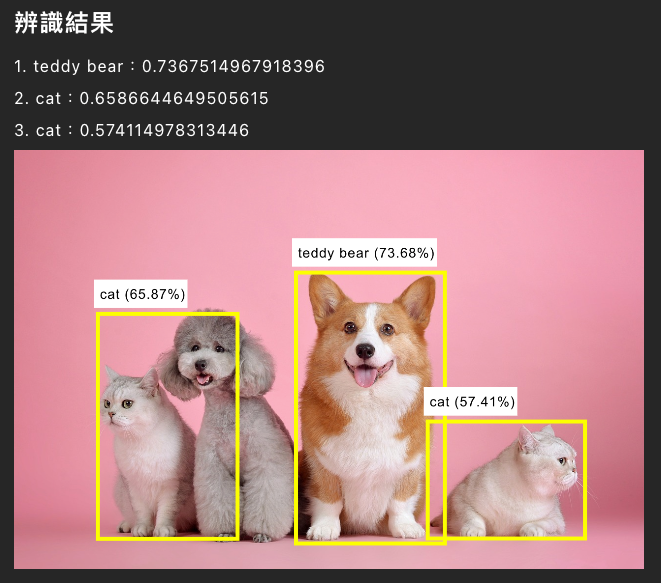
神奇的是,把柯基辨識成 Teddy Bear 了 XD。
最後來辨識物品:
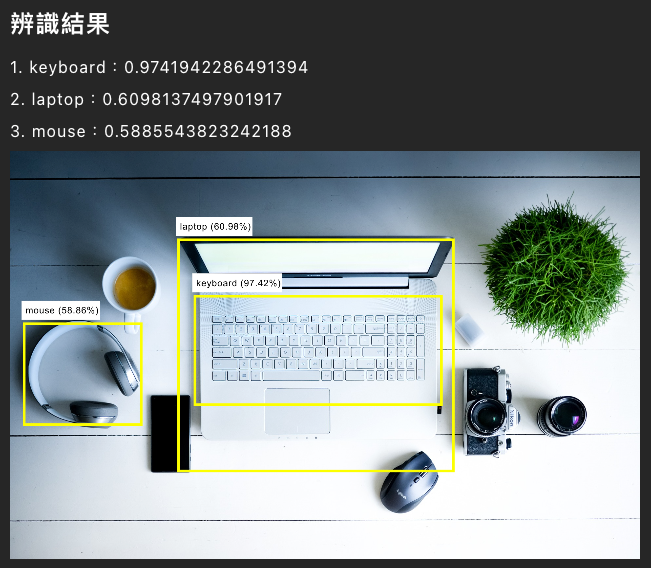
雖然相機、滑鼠、茶杯都沒辨識到,不過還行,免費的就不要求了。
最後再次附上 Demo,也附上 Demo 的原始碼,取用前麻煩多多分享本篇,你的小小舉動,對本站都是大大的鼓勵。
Demo:
https://letswritetw.github.io/letswrite-coco-ssd
原始碼:
https://github.com/letswritetw/letswrite-coco-ssd


